Using containers and virtualization together The KubeVirt project of the CNCF
KubeVirt is a sandbox project of the CNCF, which aims to combine virtualization and container environments. This allows VMs to be controlled and used from Kubernetes when applications need it.
Related companies
Install and check Kubevirt in Kubernetes.
(Picture: Joos / KubeVirt)
KubeVirt (self-spelling, hereinafter Kubevirt) is a project of the CNCF, which should make it easier for developers to write applications for virtual servers and for containers. If container technologies are to be used in an application, but components from virtualization are also necessary, Kubevirt offers an ideal interface for use.
For use, Kubevirt extends the Kubernetes API with the ability to control VMs. Console access to VMs is also possible. The tool itself does not have a graphical interface or any other UI. The central task of Kubevirt is to enable the control of VMs in Kubernetes and is completely controlled via Kubernetes tools.
The code of the open source project can be found on GitHub. The comprehensive documentation of Kubevirt helps you get started quickly. On the blog of the Kubevirt developers you can find new developments and many instructions on how to integrate Kubevirt into your own environment. The YouTube channel of Kubevirt shows some videos on how to use the environment.
If you want to familiarize yourself with Kubevirt, you can find various scenarios online at Katakoda.
Kubevirt connects VMs with Kubernetes
Kubevirt provides an interface that allows applications in containers to access virtual servers outside of Kubernetes. This allows developers to deploy their applications into containers that are orchestrated with Kubernetes.
At the same time, virtual servers can also be integrated into the environment via Kubevirt. The connection between Kubernetes and the virtual environment is controlled via Kubevirt. The applications are integrated in a common environment that Kubevirt manages.
Getting started with Minikube
The fastest way for developers to familiarize themselves with Kubevirt is to use Minikube. This allows you to build a local Kubernetes cluster, with which the development of applications is also possible.
After setting up the cluster, it can be managed with “kubectl”. When using Minikube, “minikube kubectl” is also used. To integrate Kubevirt into a cluster, Minikube also helps. The fastest way to do this is the command:
minikube addons enable kubevirt
If the installation of Minikube takes place on a virtual server, the corresponding installation instructions can be found in the Quickstart manual of Kubevirt. When deploying Kubevirt, however, it must be ensured that the solution creates some resources on the Kubernetes cluster. The hardware of the computer must therefore be able to handle it.
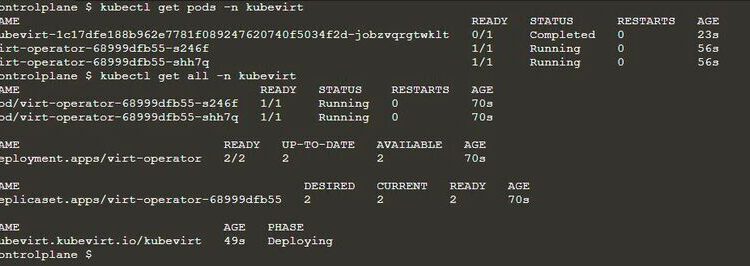
 Install and check Kubevirt in Kubernetes.
(Picture: Joos / KubeVirt)
Kubevirt requires seven pods, three services, a daemonset, three deployment apps and three replica sets for its basic operation. After deployment, the functions of Kubevirt can be tested with the following commands:
kubectl get kubevirt.kubevirt.io/kubevirt -n kubevirt -o=jsonpath="{.status.phase}"
kubectl get all -n kubevirt
Working with Kubevirt: Virtctl
 Combine Virtctl with Kubevirt
(Picture: Joos / KubeVirt)
In addition to a sample environment of Kubevirt, a test environment for Kubevirt can be set up. Kubevirt also includes the tool “Virtctl” for accessing the console and ports of the VM to perform actions in the VMs from Kubernetes.
The installation of the tool can be done in Kubernetes with the following commands:
VERSION=$(kubectl get kubevirt.kubevirt.io/kubevirt -n kubevirt -o=jsonpath="{.status.observedKubevirtVersion}")
ARCH=$(uname -s | tr A-Z a-z)-$(uname -m | sed 's/x86_64/amd64/') || windows-amd64.exe
echo ${ARCH}
curl -L -o virtctl https://github.com/kubevirt/kubevirt/releases/download/${VERSION}/virtctl-${VERSION}-${ARCH}
chmod +x virtctl
sudo install virtctl /usr/local/bin
Kubevirt can also create a VM from Kubernetes:
wget https://Kubevirt.io/labs/manifests/vm.yaml
less vm.yaml
In this example, to deploy the VM and integrate it into Kubernetes, the following command can be used:
kubectl apply -f https://Kubevirt.io/labs/manifests/vm.yaml
kubectl get vms
If “virtctl” is installed, the VM can be started directly from Kubernetes via Kubevirt:
./virtctl start testvm
To terminate a VM again, the following command can be used:
./virtctl stop testvm
If a VM is no longer needed, the following command can be used:
kubectl delete vms testvm
 A connection to the console of a VM can also be established directly from Kubevirt.
(Picture: Joos / KubeVirt)
Whether the VM has started can be tested again with “kubectl get vms”. The status of the VM can then be tested with “kubectl get vmis”. This shows the advantage of the additional installation of “virtctl”. The following command can be used to open the console of the VM:
./virtctl console testvm
Conclusion
In just a few steps, Kubevirt is implemented in a Kubernetes environment and enables the connection of VMs in Kubernetes. This opens up numerous new possibilities for developers, as applications can not only be used in containers, but also virtual servers can be connected in parallel. It is worthwhile to deal with Kubevirt if applications are not only to use containers, but also to access virtual functions.


