Quest 2 has a simple built-in capabilities of video capturing. In this article you will see how to use them, but if you are an experienced user, you will learn how to enhance video quality, shot in Quest 2, and how to transfer video to your computer.
Record and stream your gameplay in VR Quest 2
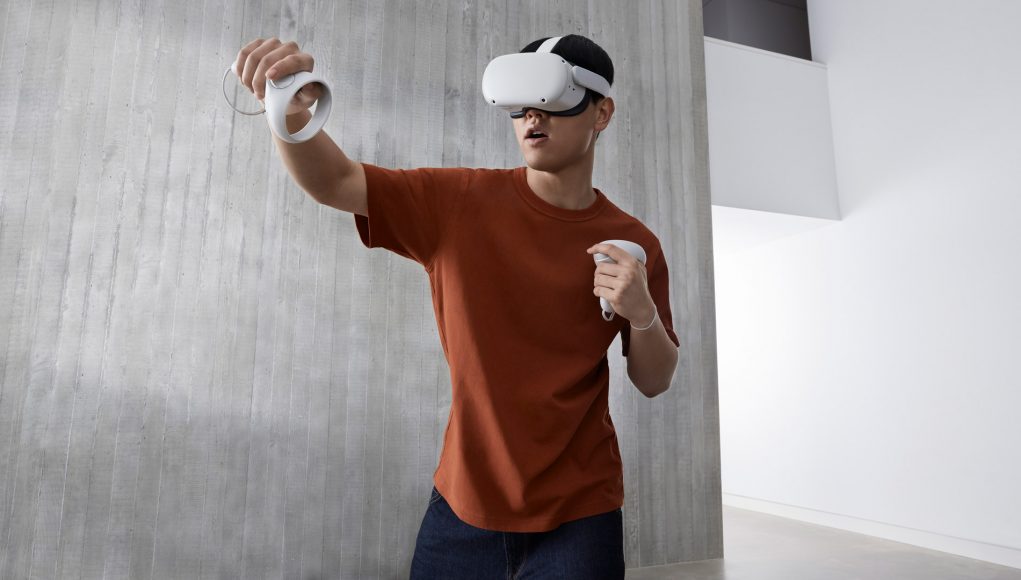
With such a cool thing, like VR, it is quite natural to want to share the experience. Fortunately, Quest 2 has many built-in options exchange. You can record videos of your gameplay to make a screen capture, broadcasting live on your phone or TV or even broadcast it live to the audience on the Internet. Here’s how:
- In the headset, open the Quest menu by pressing the Oculus button on the right controller. Scroll to “Share” (Share).
- At the top of the menu “Share” you can now choose between the “Record video” (Record Video), “take photo” (Take Photo), “live” (Go Live) and “Broadcast” (Cast).
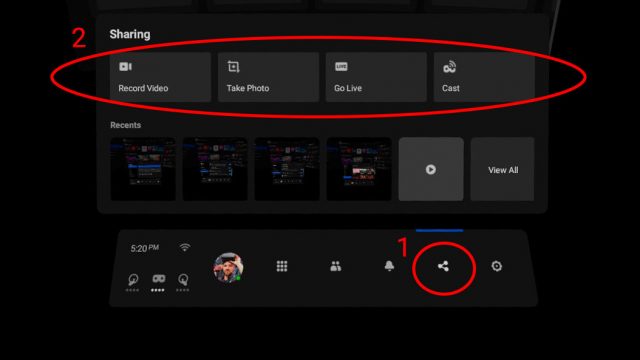
“Cast” allows you to broadcast video from your devices on your local network. You can stream on your smartphone using the smartphone app or Oculus, on your computer, visit oculus.com/cast . You can also broadcast to any compatible device in your network, such as a TV with Chromecast.
“Go Live” allows you to broadcast your experience Quest 2 on the Internet, but, unfortunately, you can broadcast only on Facebook.
The recorded videos and captured photos are stored on the headset, you can access them by clicking the “View all” (View All) in the menu “Share”. You can also connect Quest 2 for PC to download for video editing and publishing (see below).
Improving the quality of the record locking Quest 2 (optional)
Settings capture Quest 2 by default, fit to send quick videos to your friends, but terrible low quality for many other tasks. If you are an experienced user, you can increase both the resolution and frame rate recordings Quest 2. This will require a PC.
The following commands will also work in Oculus Quest, but the values may be too high for the headset; adjust them if you encounter performance issues during capture.
- Install SideQuest by following these instructions .
- Connect the headset to the computer.
- In the menu bar SideQuest click Run ADB commands> Custom command.
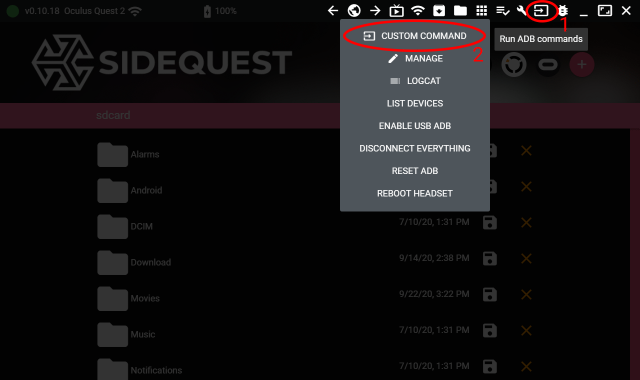
- Type the following commands one line at a time and click the “Run command” for each:
- adb shell setprop debug.oculus.capture.width 1440
- adb shell setprop debug.oculus.capture.height 1080
- adb shell setprop debug.oculus.fullRateCapture 1
- adb shell setprop debug.oculus.capture.bitrate 30000000
- When finished you can turn off the headset and use the built in function “Record video” (see top of article) to record higher-quality video with the new settings.
Reset the headset will return to the default settings.
Setting acquisition parameters
In the above steps we have set the capture resolution Quest 2 is 1440 × 1080, frame rate, capture — 72 fps and bitrate capture — 30 000 000.
For reference, the default values of 1024 × 1024, the frame rate of 30 frames per second and bitrate 5000000.
The above settings can be changed depending on your needs, but keep in mind that if you set them too high, you can cause performance issues in the game capture and the captured video (stuttering and artifacts).
The settings above are based on the balance of quality and productivity, and they work well for most games. However, if you are going to remove a lot of material, we recommend that you first test any new game to make sure that the result is correct.
Aspect ratio
It is important to note that the resolution settings that set out above, also control the aspect ratio of the video capture Quest 2. Aspect ratio default is 1:1 (square), while the settings you specified above, a bit wider and 1.33: 1, which gives the crop a bit more space on the sides.
If you want a traditional wide angle framing 1,77: 1 (16: 9), 1920 × 1080 will give you the desired shape. However, the 16: 9 format tends to be felt “cut off” at the top and bottom compared to how the image looks in the field of view headset.
How to transfer video from Quest 2 on your PC
If you want to Quest 2 was recorded raw video files, you can transfer them from your headset in two ways.
No extra software:
- Connect the headset to the computer.
- Put on your headset and take requests, allowing the computer to access the headset.
- If you do not see the request the first time, your headset is not connected properly to the PC. You may have to accept a boundary Guardian, before you see the invitation. You can also try a different USB port or try to reset the headset.
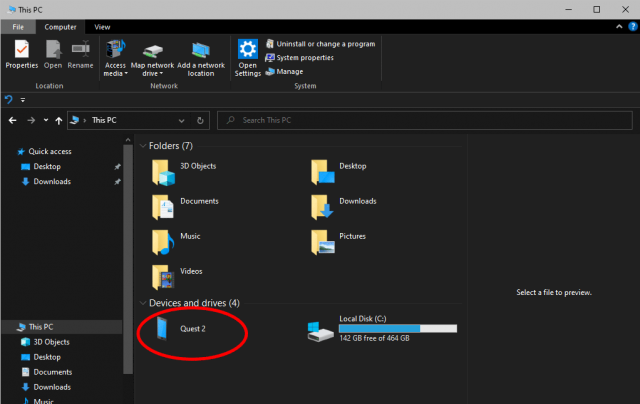
- Open Windows Explorer and go to “This computer” (This PC). “Quest 2” is listed under “Devices and drives”.
- Your videos are stored in Quest 2> Internal Shared Storage> Oculus> VideoShots.
- Drag and drop your videos wherever you want them to copy. You can also remove them here if they’re no longer needed in the headset.
With SideQuest (advanced):
- If you are already using SideQuest, it has the advantage that you can see the files headset without having to accept the invitation. Here’s how:
- Install SideQuest by following these instructions .
- Connect the headset to the computer.
- In the SideQuest menu bar, click “Manage files on your headset” (folder icon).
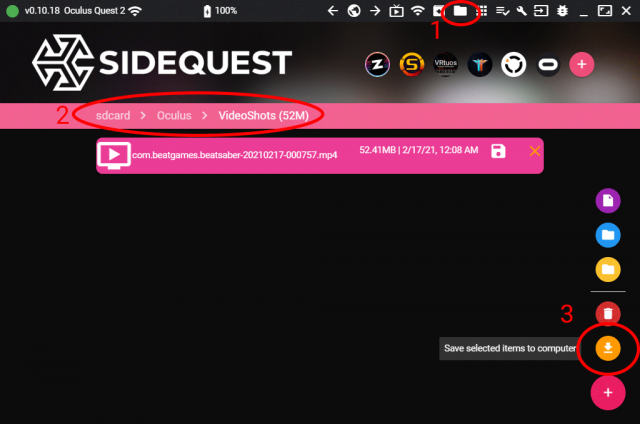
- Navigate to Oculus> VideoShots
- Click to select the videos you want to save, then move the mouse pointer on the plus sign in the lower right corner and click “Save selected items on the computer.”
- You can use the trash icon in the same menu to remove videos on the headset.